
1.1: Installing Python on Windows#
Installing Python on Windows is not difficult and can be completed in a short period of time. The first step in the process is downloading the package manager Conda, in its light form, known as Miniconda. Conda and the light form, Miniconda, are package and environment management systems. While Python is the programming language, a management system like Conda is the glue that holds all of the moving components that use Python together.
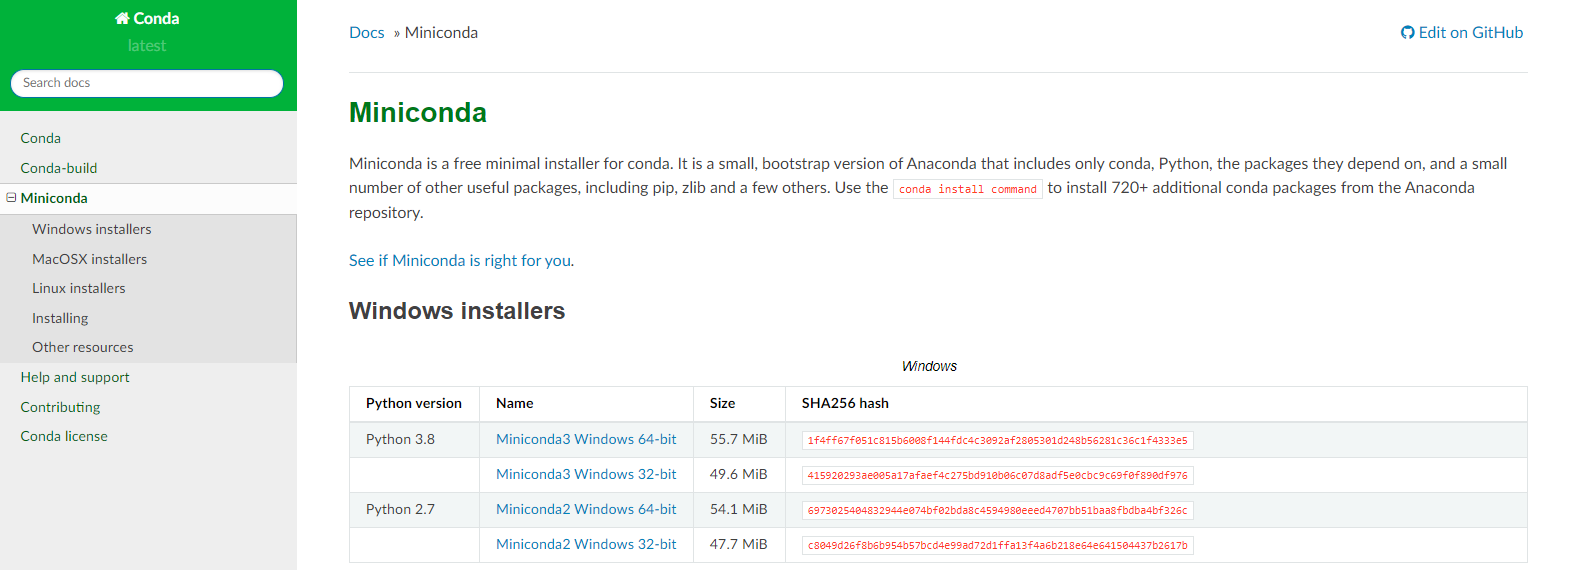
Miniconda can be found and downloaded here. Almost every user will want to download the 64-bit version of miniconda, but any concerns about the bit of your computer’s CPU can be solved here. In addition to the correct bit, all users will want to select the most recent version of Python within the miniconda options, which currently is Python 3.8.
Note
Users can also choose to download Anaconda, which is a larger and more complete management system for Python. This tutorial simply recommends Miniconda since it is a lighter version and contains all of the required utilities to complete the tutorial in full.
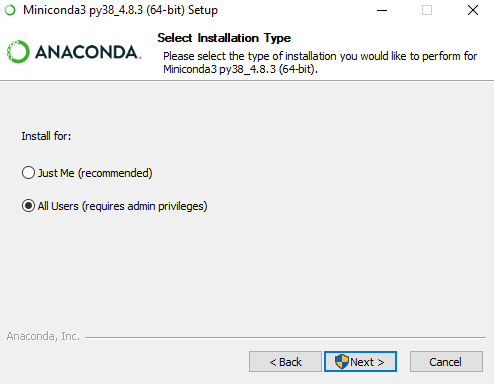
The first option that presents itself during the installation process of Miniconda asks whether or not Windows users will want to install Miniconda for “All Users” or “Just Me”. While “Just Me” is recommended by the download, we recommend choosing “All Users” unless the computer actually has multiple active users.
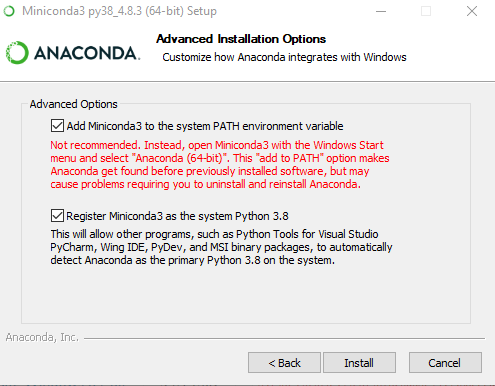
Next, the download will ask where you would like to install Miniconda. The default on Windows will most likely be in the “ProgramData” folder. There is no benefit to downloading the package to this folder over others. After choosing the installation location, a popup with “Advanced Options” will appear. On this popup, check both boxes and select “Install”. Adding Miniconda to the PATH environment variable is not necessary, but is extremely useful for anyone looking to learn Python and to use the Windows Command Prompt interface.
After this step and a few loading bars, Miniconda and the ability to use Python will be installed on your computer. Let’s run a few different tests to make sure everything checks out and to get you familiar with the new features. To start, press the Windows key + R. Then type cmd in the box and predd “OK”. This will open up the aforementioned Windows Command Prompt. Typing python and hitting enter will open up Python on your command prompt. This is one way users can run Python code. Tpye exit() in the prompt and this exits the Python interface.
Next type pip in the Command Prompt and immediately a good bit of information will pop up. Pip is the standard package manager for Python and allows users to install and manage additional packages that are not part of the Python standard library. On the command prompt you will see various commands and options that work with pip. Next, let’s make use of one of those commands and type pip install quantgov. After a few minutes, the QuantGov library (and all of the Python libraries that QuantGov uses), will be downloaded. This is the standard way to download any Python package/library. It is recommended that users also pip install pandas, pip install matplotlib, and pip install sklearn. Information for those three packages can be found in these locations:
Warning
While every step above will run without issue 9 out of 10 times, various troubleshooting steps may need to be taken. If permission issues are encountered when installing packages, try opening a command prompt in administrator mode. If PATH problems exist, manually add Python to your path variable. Finally, if issues still persist, uninstall and reinstall miniconda to a new location and for a specific User.